
Cemetery & Headstone Photography:
|
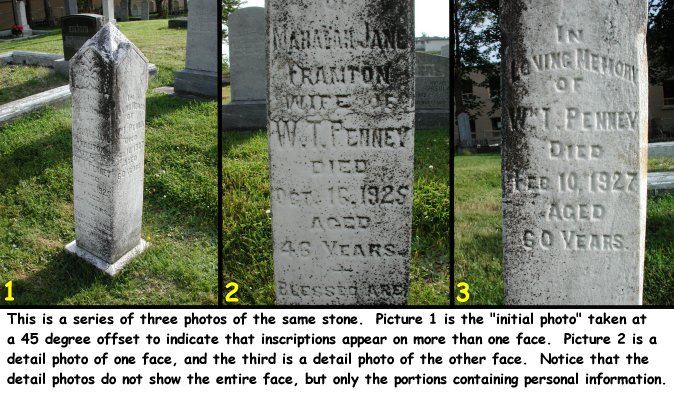
-pic 1: initial photo, LAMBERT stone, taken at 45 degrees offset ----pic 2: face#1 -------pic 3: detail of surname from face#1 -------pic 4: detail of death date from face#1 ----pic 5: face#2 (has clearly readable inscription) ----pic 6: face#3 -------pic 7: detail of birth year from face#3 -------pic 8: detail of death year from face#3 (1st attempt) -------pic 9: detail of death year from face#3 (2nd, different angle) -pic 10: initial/only photo, FOWLER stone, taken straight on -pic 11: initial photo, RIDEOUT stone, taken straight on ----pic 12: detail of year of death -pic 13: initial/only photo, JOHNSON stone, taken straight on |
If the information appears only on the front and back of the stone, obviously it is impossible for the "initial photo" to show both sides simultaneously. In this case a large pebble, leaf, small branch, coin, lens cap, or some other noticeable object should be temporarily placed on one side of the top of the stone. Rather than taking the initial photo at a 45 degree offset, each of the two opposite faces will be photographed individually from straight-on. The object placed on the top will appear in both photos, but in one photo it will appear on the left side; in the other photo it will appear on the right side.
There is an excellent technique for making this judgment call in the field: When you look through the camera lens to frame the initial photo, observe whether or not you can read all of the text through the camera lens. If you cannot, or it's a close call, lean towards the conservative and take a detail photo.
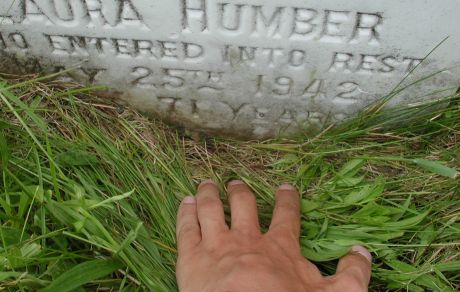
Sometimes detail photos are necessary when the stone has become too deeply buried so that soil or grass is obstructing part of the information. In this case, one hand might be used to hold back the grass or soil while the other is use to photograph a detail that is being temporarily exposed. When working with a partner, we generally attempt to avoid photographing each other except in the distance, however our hands often appear in photos when necessary to assist in the work... a typical situation might be if an assistant is holding a broken piece of stone in place.
In order to speed up the fieldwork begin looking over the next stone while approaching it. Observe things that might affect how the stone will be dealt with:
- Is there information written on more than one face?
- Is the stone buried too deeply to see all of the information?
- Are foliage, insects, flowers, etc. obstructing the text?
- Does the surname appear on the face, or alone on the back?
- Is there litter on the ground that might spoil the photo?
The most common obstacles obstructing clear views of stones are flower arrangements, tall grass and weeds. Stooping and bending required to take pictures of headstones is in itself enough to exhaust one's back by the end of a day. Therefore, any additional bending and stooping required to move these obstacles is added work and strain. With that in mind, one might first attempt to eliminate tall weeds and grass by first trying to press them under foot. Flower pots generally require bending over twice: once to remove them and once to replace them. When bending over in front of a headstone with a camera hanging freely around your neck, be careful of it swinging forward and crashing into the stone.
In badly overgrown cemeteries there may be relatively tall and sturdy bushes or roses growing in front of a stone. On occasion I have used a saw or clippers to remove them, but generally it is best to hold them out of the way with one foot, or by wrapping a leg around and sort of sitting back on them while taking the pictures. Obviously when the offending plant is a rose bush, one should proceed with caution.
Watch out for bees and wasps nesting in the ground or very close to a headstone. Try to sneak the camera in as close as possible without risking a sting. Move slowly and be prepared to run!
Perhaps the most frustrating obstacles you will encounter in trying to get good photos are the shadows cast onto the face of the stones by strong direct sunlight filtering through overhanging trees and branches. Strong shadows give rise to a situation of high contrast that cameras typically do not respond very well to. Your best judgment in each particular situation will be required, but here are some possible approaches to the problem: If working with a partner, perhaps the partner can either hold the offending limb or bush out of the way completely to provide full unobstructed sun on the area of the faces of the stone where the inscription is written, or on the other hand, move the offending limb or bush to fully block all direct sunlight to cast an even shadow over the entire face of the stone. "Body blocking" also works... use either your own body or that of your partner to help create an even shadow over the face of the stone. The idea is to have either all shadow or all sun on the stone. Sometimes I have used my hat to create shadows for detail photos of a small area of the stone. An umbrella would be an excellent tool to make a big shadow, but it's one extra item to carry, and might require two people working together. I haven't tried it except in the case of rain, and that definitely requires two people. When photographing in the rain the camera lens should be inspected after each photograph because a small drop of water on the lens can ruin all subsequent photos. With that in mind it is a good idea to inspect the lens many times during a day of photography checking for specks of plant material, hair, or insects.
If a cemetery is heavily planted with large trees, the limbs will be out of reach and too big to move. Rather than dealing with so many problems with shadows, it might be better to skip that cemetery temporarily. Wait for an overcast or cloudy day when shadows won't appear. The use of flash photography to soften shadows is discussed below.
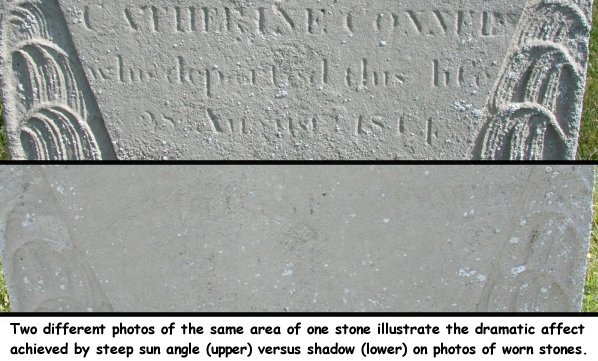
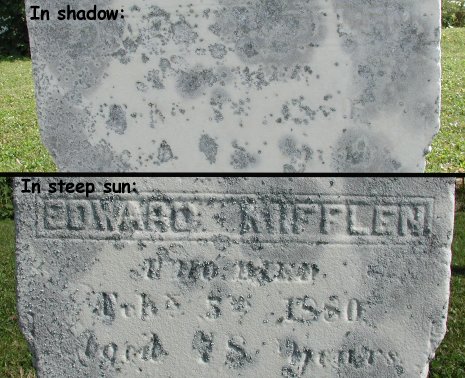
There is one situation in which very strong sunlight and shadows can be of great benefit: when the inscription on an old stone is almost completely worn away. Most, but not all of the headstones we photographed in Newfoundland faced east. The morning sun gave excellent lighting to the face. Between 11 AM and noon, the sun has swung around towards the southern part of the sky on its way towards the west later in the afternoon. It was between 11 AM and noon that the sun struck the face of the stones at a very steep angle casting a slight shadow into the depressions that many years ago were readable letters and numbers carved into the stone. Very often I have arranged my photo plans around that magical time between 11 and noon. Typically this is when a given cemetery contains a large number of stones that required steep sunlight on the faces. If the cemetery is big, you might have to work quickly, because at approximately noon, the sun will be completely to the side of the stone, and for the rest of the day, the face of the stone will be in a shadow.
Experience in Newfoundland showed that using the camera's flash while photographing stones was generally not beneficial. The primary problem with using flash is that many stones sort of amplify and reflect the flash in a rather bizarre manner, often causing a washout effect. If you think that conditions warrant taking a flash photo, then it is imperative that the same photo is retaken without flash.
Be careful that your flash is not automatically firing without your realizing it when taking pictures in heavy shade and other low light conditions. It could potentially ruin a whole series of photos. All digital cameras provide control for locking off the flash.
One of the occasions that I often attempt a flash photo is when bright sunlight is casting heavy shadows on the face of the stone. The flash softens the shadows, but may ruin the photo of the stone at the same time due to the reflective properties of the stone. Another problem is that a flash photo taken straight on will fill in the shadows created by the inscription, the reading of which is typically improved by the contrasting light. Always take at least one photo without the flash.
In order to use as much of the frame/image area a possible, always orient the camera to fit the geometry of the stone. For example, tall vertically oriented stones should be photographed with the camera turned on end. When taking vertically oriented photographs, you have a choice of either rotating the camera 90 degrees clockwise or 90 degree counter-clockwise from the horizontal. You should choose one direction and stick with it throughout the project, the reason being that when you later rotate the photos coming out of the camera to the computer, it makes the task much easier if the vertically oriented photos can all be rotated in the same direction.
My personal experience is that it is easier on my right shoulder if I rotate the camera clockwise for vertical shots, but it takes a few extra mouse clicks to rotate the finished pictures using the software that came with my camera.
As a general rule of thumb, the best way to photograph a flat surface is with the camera straight in front of the center of the face of the surface: "The plane of the camera should be parallel to the plane of the face of the stone." When these two planes are not parallel, the subject becomes distorted. For example a rectangular headstone photographed in plane will appear rectangular in the finished picture. If it is photographed out-of-plane, it will appear as a trapezoid (four-sided polygon with sides not parallel) in the finished picture. The lettering on the stone is distorted as well. If a badly worn stone is photographed badly out-of-plane it may be more difficult to read.

To take a photograph of a headstone in-plane, one would have to located the approximate center of the face of the stone, extend a imaginary perpendicular line out from there along which the camera would be placed in such a way that the camera is looking straight onto the center of the face of the stone. This is how you would aim the camera in a perfect world.
Unfortunately in-plane photography of headstones is not too practical for a variety of reasons. Imagine a typical headstone that is two feet (24") tall. In order to position the camera in-plane, the camera must be held in a position only one foot (12") from the ground. The stooping and bending required would quick wear out a photographer trying to do an entire cemetery with in-plane photos. Many times obstacles around the stone, bright sunlight/sky behind the stone, or other conditions will made it desirable to photograph the stone out-of-plane. One will quickly discover that taking a perfect in-plane photo versus taking a less-than-perfect much be balanced among a tired back, photographer's physical height, the height of the stone, the quality and readability of the lettering on the stone, and the quality of the lighting. Every stone requires a judgment call, but certainly it is not desirable to show tops better than the faces!
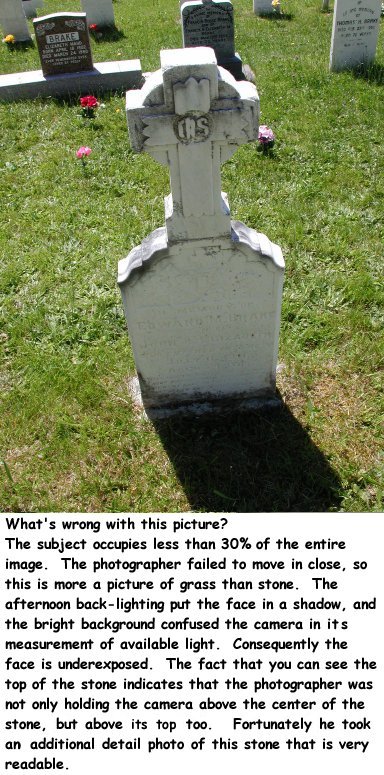
Afternoon sun typically backlights stones leaving their faces in a shadow. Cameras typically sample the light from all over the image to determine the average it will use to compute the lens speed. Backlighting raises the amount of light entering the camera to a level that is not consistent with the amount that is being reflected from the face of the darker headstone. The finished photo will probably be too dark. In the afternoon on clear sunny days, it is very important to minimize the amount of sky in your photos so that the average light seen and measured by the camera is primarily from the stone. Minimize the backlighting by moving in close to your subject and filling the image area with the stone.
Most modern digital camera can be set to choose different methods for measuring the amount of light upon which to base lens speed. Consider programming the camera to measure light primarily near the center of the photo if that option is available.
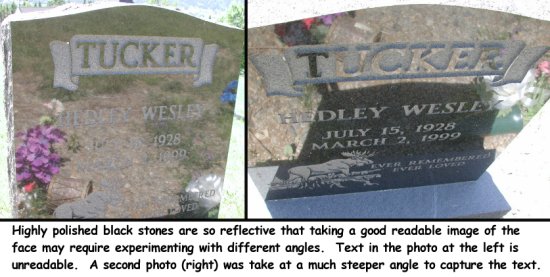
Stones having highly polished and reflective faces can be a real challenge to photograph. Black ones are the worse as they become like mirrors in certain lighting conditions. The problem is that a photo of the "mirror" is needed and not what is seen in the reflection of the mirror. Frequently we had to photograph these stones at very odd or steep angles to make the inscriptions visible. If you cannot read the stone through the camera lens, then you probably won't be able to read it in the finished picture.
Sometimes it will be a challenge to find any angle at all to photograph these stones in which case you might have to photograph the inscription in two separate sections. Also experiment with using the flash.
It seems to be human nature for inexperienced photographers to be too far away from their subject when taking pictures. Strive to get close to your subject. How close is close enough? When you look through the viewfinder to frame the stone, you should see the stone almost touching two of the edges, either top and bottom, or left and right. What you will discover is that most digital cameras actually capture a little more around the edges than you see through the viewfinder. So if you are already leaving a little bit of space around the stone when you frame it, and the camera adds a little more, you may end up with a photo whose surface area is 50% stone and 50% grass! It is better to use that valuable bandwidth for capturing details in the stone.
A person sees an object because the light that strikes it is reflected into their eyes. It's a simple matter of physics that the farther away you move away from an object, the more the reflected light has becomes scattered, and the less there is reflected from the object to enter your pupils. This is why distant objects are not as bright as close-up objects. This is a very important principal in photography: When you half the distance between you and the subject, you increase the amount of light reflected into your pupils from the subject by a factor of four (a power of two relationship). If you double your distance from a stone, you cut the available light reflected from the stone into the camera lens by a factor of four! The camera may still be receiving the same total amount of light from the surrounding area, but the subject is giving less of its available light to your picture. Unless circumstances dictate differently, leave your camera's lens set to wide angle. It will force you to move in close to the subject, and more importantly, will reduce the affects of camera motion to a minimum. That motion makes the finished picture blurry. The affects of camera motion are maximized when telephoto is used. This phenomenon is also a power of two problem! That is why a tripod is typically needed to hold a camera still enough to take telephoto photos. Only deviate from the wide-angle lens setting when conditions demand it, for example, if a headstone is enclosed by a fence that cannot easily be crossed. If possible, prop the camera on the fence to steady it when using telephoto to "reach the stone".
When a marksman pulls the trigger on a gun, he does it by gradually increasing the pressure on the trigger until the gun fires. The problem caused by pulling the trigger too fast is that the tiny mass (weight) of the finger is enough to jar the relative large mass of the gun to the extent that the target is missed. The same is true for cameras, except the mass of the trigger finger compared to the mass of the camera is much greater than compared to a heavy rifle. Pressing the button on a camera jars the camera. If you jar it badly and lighting conditions are such that the shutter speed is slow, you will get a blurry image. It's a shame to go to all of the work of making headstone photos only to return home and find that many of them are blurry. Unfortunately we got this lesson over and over the hard way and ended up retaking many pictures.
So what exactly is the lesson learned? Every time you prepare to press the button, you must pause a moment and think about employing this simple technique for the next two seconds of your life that ultimately make all the difference: Concentrate on holding the camera as still as possible, literally hold your breath, slowly squeeze down on the trigger until it snaps, and continue to hold the camera motionless and not breath for another instance (half second) while the camera completes its work. Don't be tempted to get in a hurry and throw your body into motion towards the next stone before you have waited that extra half-second. Different digital cameras have different characteristics. Many have a built-in delay so that there is a short pause between the time when the trigger is depressed and when the shutter actually opens and closes.
An interesting note: we have found in practice that we do a pretty good job following the technique while photographing the headstones, only to discard it when we are finished with the headstone and begin wrapping up the work in the cemetery by taking the "view" photos showing the layout of the cemetery. You must force yourself to always practice good shutter release technique! It does not pay to get in a hurry; you only lose the time later when it is necessary to return to retake bad photos.
Perhaps nothing is more dangerous in an old cemetery than a stone falling on you. Never underestimate the immense weight of these things, typically 150 pounds or more per cubic foot of material. There are two kinds of stones that can fall on you:
- the ones that have already fallen, and you are attempting to flip them for a photo,
- the ones that haven't fallen yet, but are about to!
A few other hazards to be aware of when working in cemeteries:
- snakes;
- sunburn;
- poison ivy;
- deer ticks carrying Lyme disease;
- bees and wasps nesting around stones,
- dehydration and heat exhaustion/stroke;
- falling through a hole into the grave itself when a wooden casket has rotted away leaving a big void underground;
- tripping over barriers and small fences erected around a grave site;
- getting jabbed by the sharp points on a iron fence while stepping over it;
- having a rotten wooden fence collapse while trying to cross it;
- cutting your hands and knees on broken glass from old flower vases or broken beer bottles;
- tripping over flowerpots and other objects left at the grave,
- stepping on your camera... what? If you have the urge to place your camera on the ground for a moment to rub the stone or help out your partner, don't underestimate the importance of putting it in a safe place: on the ground right up next to a stone, or hang it from the stone or a tree limb.
- from the first moment you pick up your camera to exit the car, you should get in the habit of hanging it around your neck, because if you don't, you will eventually drop it... a terrible tragedy that can be avoided by good protocol.
Many headstones have a brass or ceramic attachment containing a portrait of the deceased. Consider taking a close-up of it, the idea being that the cemetery photos being taken will probably outlive the headstone and pictures of the deceased owned by the family.
Once you have completed photographing the headstones in the cemetery, take the "view photos" of the cemetery itself. The goal is to provide the viewer an overall image of what the cemetery looks like, its immediate surroundings, how it is laid out, etc. When we first began the Newfoundland project, we were only taking one or two view photos of the cemeteries. As time progressed we realized the importance of taking more, with the total number of view photos being dependent on the conditions in individual cemeteries. View photos are of little use when the cemetery is overgrown so badly that the stones aren't visible from a short distance away.
As a general rule of thumb, we try to take enough view photos so most of the stones can be found in at least one view photo. If one studies the view photos later, it's amazing how well individual stone features (shapes, colors, flower arrangements, etc.) provide a means for locating a single headstone among a large number of them. For deteriorating cemeteries, the view photos can provide a future means of finding lost graves.
If there are interesting natural or man-made features in the vicinity of a cemetery, it's a good idea to include them in scenic photos. These are important in that they can give researchers living far away from the area a look at the region where their ancestors lived. Far into the future these pictures will offer a peep into the way things looked in the past.
A lot has been said about rubbing stones, and the popular opinion seems to be that it is a bad thing. But when the purpose of the rubbing is to prepare for a picture that will be archived and will digitally preserve that stone forever, it is my feeling that it should be done when the circumstances are appropriate.
Before rubbing a stone it is important to fully photograph it first in its natural state following the standard procedure. After is it rubbed either the entire series of photos can be repeated beginning with a new "initial photo" or perhaps only a face or detail photo will be necessary. The choice is a matter of judgment and experience. In two extreme cases I took 20 photos of a single stone!
We never used chalk for rubbing during the Newfoundland project due to concern that the chalk would stay on the stone too long and upset people. Rather we developed a technique that I have never seen documented anywhere. I have to give credit for discovery of this technique to Slavek Sustr who helped me during the first summer of photography in Newfoundland. We were working up on a mountainside a long hike from the car where we kept a small broom and rags for wiping stones. He used vegetation to wipe the face of a stone out of necessity when it was found on the ground too dirty to photograph. As the summer's work wore on we continued to develop and refine the technique, experimenting with a variety of different plant species.
Through trial and error it was discovered that certain species of vegetation worked better on certain stone types, and varied with surface coarseness as well as how wet or dry the stone was. We also discovered that the properties of a given type of vegetation changed from the earlier wet season to the drier late summer season. For example one species of maple leaf worked well on course stones in their mature late summer state, but if used in a young and tender state earlier in the summer, would tear apart and fill the voids in the stone rather than highlight them. Another species of maple never worked suitably.
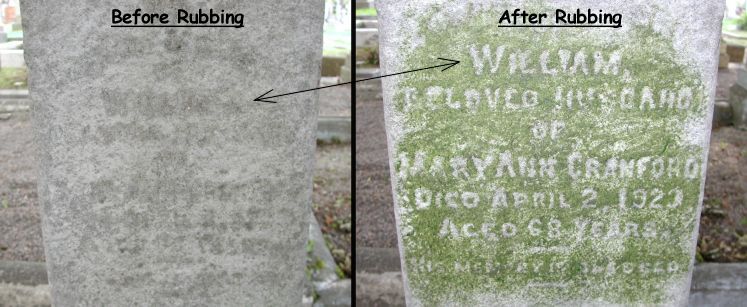
We did a huge number of rubbings in the old Anglican cemetery in St. John's. When photography was completed it was a little embarrassing to look at the cemetery and see all of the stones we had discolored. We found that generally a day in the sun was enough to turn a bright green rubbing brown. As more days passed, the stones just looked a little dirty like some of the ones that have a lot of lichen growth. We returned to that cemetery the following summer for inspection and were relieved to find absolutely no trace of the previous summer's rubbings. I might add that there is a species of snails in Newfoundland that seems to be prolific in cemeteries. They serve a very important function in eating the lichens from the stones and keeping them somewhat clean. I have little doubt that the plant material we rubbed on the stones proved an easy and irresistible meal for the hungry slugs!
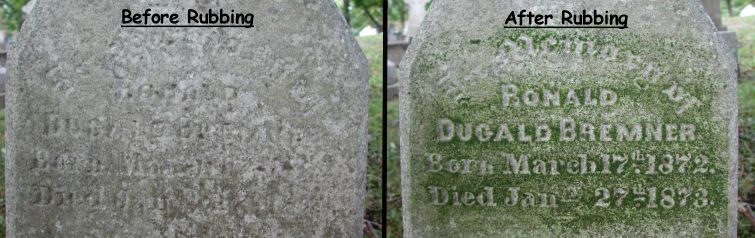
How much plant material should you rub on? It really depends on the individual unique circumstances of the stone and the material with which you are rubbing. Occasionally rubbing will actually make things worse. This is one important reason for always photographing the stone prior to rubbing it. When doubtful about the benefits of rubbing a particular stone, rub it very lightly at first until the letters first become somewhat readable, photograph it, then try rubbing it a little more, taking additional pictures as necessary.
On the subject of rubbing, I would like to describe another technique that was taught to me by the superintendent of the General Protestant Cemetery in St. John's. When he first began illustrating the technique I was horrified and had the urge to grab his arm and say, "No, don't do that!" I was silent, and I learned something interesting from the experience.
He used a whetstone, the same kind used to sharpen a knife, to rub the surface of the stone in a circular pattern. On first look you might think this a very destructive technique, but actually he was not grinding the stone, but rather the lichens growing on the surface. Most old stones and rocks that have been exposed to the open air for a long period of time have at least a very thin layer of lichens covering their surface. The uniformity of the color in the lichens often makes reading an old stone very difficult. When the lichens are in a dry state during the summer, rubbing them with a flat whetstone will grind them into a fine light colored powder that sort of paints the stone and highlights the lettering. The idea is to apply just enough pressure to grind the lichens, not the headstone. This is a spectacular technique when the conditions are just right. It works particularly well if the stone is dry and has lichens growing on it. Through trial and error you will learn to recognize stone types and conditions where it will work best. I did not employ this technique very often, but a small piece of whetstone can conveniently be carried in your pocket during photography.
Another special technique was used on certain gray granite stones that had a finely polished surface and lettering that was not colored in any way. These are the awful ones that are almost impossible to read even when they are new! When these stones are standing up vertically, we discovered that pulling up a clump of vegetation by the roots along with some damp soil provided a convenient means for discoloring the lettering on the stone. Rather than rubbing with plant material, we rubbed dirt/mud into the lettering. Only a little is necessary to make them readable and the next rain will wash it away. When the weather is dry and the stone is lying down, a slightly different technique is to spread some dry soil on the surface of the stone, then wipe it off, leaving the carved lettering filled with the darker soil.
Another technique that might work well, but which I have never actually tested on those hard-to-read granite stone is this: Most rock climbing stores sell little bags of powdered chalk made from material that resembles a woman's stocking. I suspect that the bag could either be rubbed or patted on the stone in such a way that the rougher carved lettering would pick up enough powder to become clearly visible.
After the fieldwork is done go through all of your pictures and evaluate what you did right and wrong. Consider the following:
- Are any of them blurry? Why?
- Are they too much out-of-plane?
- Can you see more of the top of the stone than the face?
- Were you paying attention to obstacles?
- Did you take an "initial photo" of the entire stone?
- Should the stone have been rubbed?
- Did you miss a detail that is unreadable in the finished photo?
- Is it obvious which headstone a detail photo is part of?
- How's the lighting?
- Would a detail photo have been better taken at a different angle?
These are items you might want to have in your car or pocket:
- camera
- spare film (pocket)
- spare batteries (pocket)
- battery charger
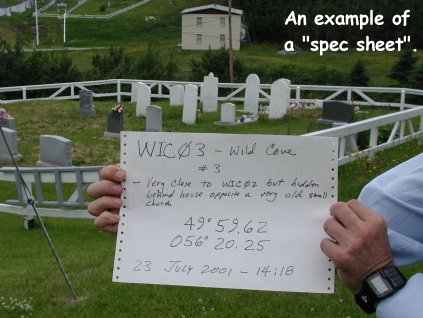
- paper for spec sheet & felt tipped pen
- GPS receiver
- maps
- directions to cemeteries
- compass
- disinfectant & bandages for cuts and scrapes
- first aid kit
- sunscreen
- hat
- leather gloves
- small shovel
- spoon or stick to aid in digging out a few inches of soil around stones
- pocket knife for cutting out grass at the bottom of a low stone
- whetstone
- lens wipes
- "Wet-Ones" or baby wipes to clean your hands (don't use them on the camera lens because they are a little oily)
- water
- snack or lunch
- a record of the last few stones photographed in a previously uncompleted cemetery to aid in locating where work left off
- rubber boots
- rain gear
- extra shoes and socks
- a change of cloths
- insect repellant
- pencil & paper/sticky notes (you can stick a note on the stone and photograph it if necessary for some reason)
- log book for recording cemeteries
- pruning shears (car or pocket)
- small hand saw (car)
- walkie-talkies or phone for communicating with a partner in a large cemetery